Turning your garage into a functional workshop is one of the most rewarding home projects you can tackle. Whether you’re into woodworking, auto repair, crafting, or general DIY projects, having a dedicated space designed for your work makes every project easier and more enjoyable.
However, a workshop garage needs more than just a workbench and some tools. The layout and flooring you choose will make or break your ability to work efficiently and comfortably.
We’re here to help. Read on for simple and actionable tips on how to design a workshop garage that actually works for you.
Start With Your Workflow
Before you buy a single piece of equipment or storage, think about how you actually work.
Do you typically move from cutting to assembly to finishing?
Are you working on large projects that need floor space, or smaller items that stay on benches?
Map out your typical project flow and arrange your workshop zones accordingly. You might need a cutting area near the garage door for ventilation, an assembly zone in the center with good lighting, and a finishing station away from dust-producing tools.
This kind of thoughtful planning prevents the frustration of constantly moving things around or tripping over equipment.
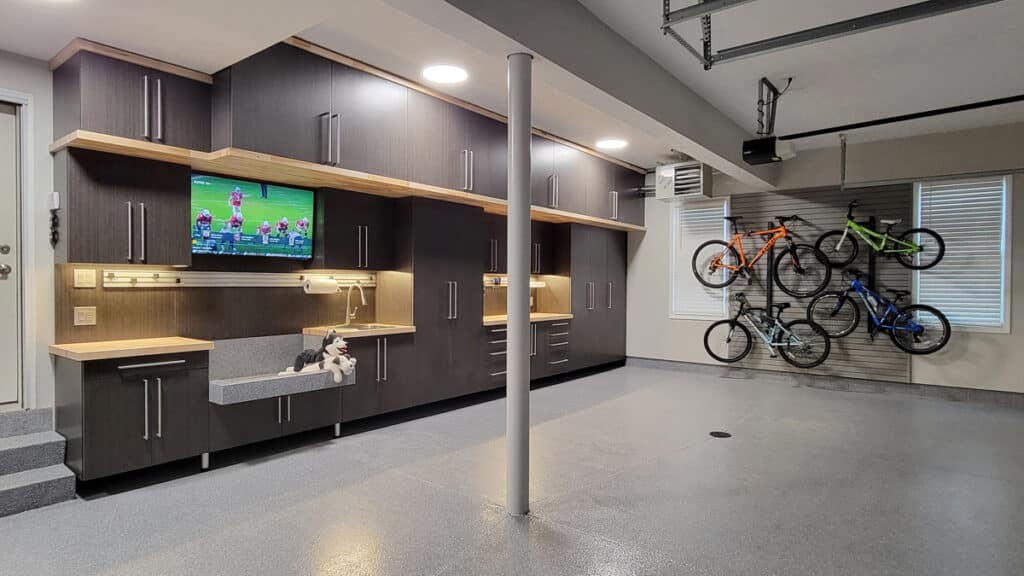
Choose Flooring That Can Handle the Work
Your garage floor takes serious abuse in a workshop setting. Dropped tools, chemical spills, rolling equipment, hot sparks from welding — it all adds up. Consider this, and you’ll easily see where your flooring choice becomes critical.
Bare concrete might seem fine at first, but it cracks under impact, stains from oils and solvents, and generates dust that settles on your projects. On the other hand, a polyaspartic floor coating creates a durable, chemical-resistant surface that stands up to workshop demands while staying clean and easy to maintain.
The smooth surface also makes it easier to move heavy equipment and roll tool chests exactly where you need them.
Plus, if you drop an expensive tool or piece of hardware, you’re more likely to find it on a clean, well-lit floor than on stained, dusty concrete.
Maximize Vertical Storage
Workshop garages fill up fast. Between power tools, hand tools, materials, and works-in-progress, horizontal space disappears quickly. The solution is surprisingly simple: build up, not out.
Wall-mounted cabinets keep your tools organized and off the floor while protecting them from dust and moisture. Quality garage cabinetry designed for workshop use can handle heavy equipment and provide dedicated storage for different types of tools. Having specific homes for your gear means less time searching and more time building.
Consider pegboards or slatwall systems for frequently-used hand tools. When your most-reached-for tools hang within arm’s reach of your workbench, your efficiency jumps dramatically.
Plan Your Power Situation
Nothing kills momentum like realizing you don’t have enough outlets or that your extension cords have become a tangled mess on the floor. Before you finalize your layout, think through your electrical needs.
You’ll want outlets at workbench height, so you’re not constantly bending down to plug things in. If you use multiple power tools simultaneously, make sure your circuits can handle the load. Some serious DIYers even add dedicated 220V circuits for larger equipment.
Lighting Makes All the Difference
You can’t do quality work if you can’t see what you’re doing. Natural light from windows is ideal, but most garages don’t have enough of it. Supplement with bright overhead LED fixtures that eliminate shadows across your work surfaces.
Task lighting at your primary workbench is non-negotiable. Adjustable lights let you direct illumination exactly where you need it for detailed work. If you do finishing work or painting, consider full-spectrum bulbs that show colors accurately.
Create Dedicated Zones
Even in a smaller garage workshop, you can create distinct areas for different activities. This organization prevents cross-contamination between messy and clean work, and it helps you mentally shift between different types of tasks.
A dust-producing zone for cutting and sanding should be separate from your assembly area. Keep finishing supplies and clean work away from areas where sawdust flies. If you work on vehicles, designate a space with proper drainage where you can handle fluids safely.
Your floor can actually help define these zones visually. With different flake colors or patterns in your polyaspartic coating, you can create distinct areas that make your workflow even clearer.
Leave Room To Move
It’s tempting to fill every square inch with storage and equipment, but you need space to work comfortably. Leave clear pathways between work zones, so you can move materials and projects without playing Tetris every time.
If you build furniture or work on larger projects, you’ll need floor space for assembly and finishing. Don’t sacrifice this working room just to squeeze in one more storage cabinet.
Build Your Ideal Workshop From the Ground Up
A well-designed workshop garage grows with your skills and projects. Start with the fundamentals — durable flooring, smart storage, and a layout that matches your workflow — and you’ll have a space that makes every project more enjoyable.
We help Ohio DIYers and craftsmen create workshop garages built to last. Our polyaspartic flooring handles the toughest workshop conditions, while our custom cabinetry keeps your tools organized and accessible.
You build your space. We take care of the floors.
Contact us for a free consultation.